
Here are a few highlights from this week:
Week 5 (September 17 -
September 21, 2018)
Giggles: Why did the scientist install a
knocker on his door?
To
win the no-bell prize.
FREE/OPTIONAL Professional Development
(PD): Here’s a date to mark on
your calendar.

DETAILS: Building a website is
easier than you might think. Click. Drag. Adjust. Move. I’ll walk you through
the steps to get you started. Or, maybe you have a website started, but you
can’t quite figure out a few bits. If that’s you, come on over! Have an old
Site? Did you know you can convert it to the new format? Yep! You can. Come and
learn how to do that.
REGISTER HERE
REGISTER HERE
Getting onto Clever at
Home. Are your students having
problems getting into Clever at home?
Are parents emailing you? Here’s
a short video that will answer their questions.
Feel free to add this to your website to aid/assist parents/students
with this process. LINK HERE
Prodigy. So there
are two links now. Which one do I
use? The previous button didn’t
work. This one does, but there’s one
more important detail. Watch and see. LINK
HERE.
Free Music. Do you ever make videos for YouTube? Or slideshows for your campus? Athletics?
Yearbook? Is it too costly to
purchase music again and again? Well,
YouTube has free music. Check out this
link if you are in search of some background music for your video work. LINK HERE.

Word Cloud. Back in April, I taught several of my classes how to use WordArt.com
to build a Word Cloud. If you are
unfamiliar with this tool and would like to try it out, you can find a video
that will show you how to do this HERE. So, how do you (the teacher) have access to those
finished files? Glad you asked. You can use this tutorial to see how to print those
final projects.

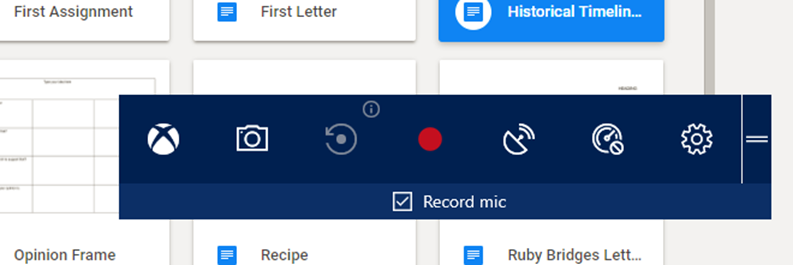
Video Capture. If you have the Windows 10 operating system
on your computer, you have access to video capture software. Use Windows + G. This initial window will pop up. Click Yes.

When you are ready to start recording, click the red dot (image below). Confirm that you are recording your
microphone. And, you are good. By default the videos will be saved in the
Videos folder. You can choose the gear
to select an alternative spot for saving those captured videos.
Here’s a blog
with more info on how to get started.
Screen Orientation. Have you ever faced this? “Teacher, the screen is sideways!” Here is an
easy fix: Ctrl + Alt + Up Arrow. If you
are in the locked screen mode, sign in while the screen is sideways and then do
the above task. This should remedy the
problem. Wait about 6 seconds after you
perform that keystroke pattern for the orientation to right itself.

YouTube Face Blur. So, what if you want to post something to YouTube,
but there’s one person in the video who’s face should be blurred? Or you want to blur out personal information
of some kind (username, password, etc.)?
Ugh! No worries. YouTube will now let you blur that face/information
easily. Head over to the YouTube video
editor space and check out those buttons.
Now that face is no longer public and your video is ready to
launch. VIDEO LINK HERE.
 |
| Image Credits: screen capture from video (link above). |
Kindly,
No comments:
Post a Comment
Note: Only a member of this blog may post a comment.